Editor’s Note: Looking for information on how to track blog post performance in Google Analytics? Are you still using the traditional version of the platform – Universal Analytics? You are at risk of losing any of your historical performance data in 2023 if you don’t set up and properly configure Google Analytics 4. Learn how the two platforms compare to each other in this blog post – Google Analytics 4 vs Universal Analytics.
I won’t bother going into why you need to be blogging in 2020. Any good digital marketer can tell you that. If you’ve seen success in content marketing– that’s great! Most of our clients and yours truly have, and do, as well. As your blog grows, inevitably so will the number of contributors. With multiple authors, multiple posts per author, and multiple sources/mediums per post, author analytics data can be quite confusing to trudge through.
Luckily for you, I have found myself manually tabulating blog post performance by authorship too many times. Without further ado, here is how to group blog metrics by authorship using a custom dimension in Google Analytics.
Create a new custom dimension in Google Analytics
- Analytics -> Admin -> Property -> Custom Dimensions -> New Custom Dimension
-
-
- Name: Author
- Scope: Hit
- Active: Yes
- Click Create
-
Get the JS selector for author name on your website
- Visit a blog post on your website using a Chrome browser and locate the author’s name within that blog post. Right-click on the author’s name and select Inspect.
- The chrome developer console will appear at the bottom of your screen. Locate the author name within the code, right-click on it and select Copy -> Copy JS path
- You should now have something like this in your clipboard:
document.querySelector(“#content > div > div > div.blog-main > div.meta > em > span.author > a”)
To verify that this code will fetch your blog post author names, navigate to a blog post on your website, open the Google Chrome Developer Console (CTRL + Shift + J) and navigate to the Console tab. Paste your code in the console and press enter. You should see something like the following:
- Turn your JavaScript path into a custom JS function by copying the below code and replacing PASTE_YOUR_JS_PATH_HERE with the path you copied in the above step.
function () {
return PASTE_YOUR_JS_PATH_HERE.textContent;
}
- You should end up with something like the following – save this for later (don’t worry about spacing or line breaks):
function () {
return document.querySelector(“#content > div > div > div.blog-main > div.meta > em > span.author > a”).textContent;
}
Configure GTM to send Blog Post Author Analytics Data to GA
- Import my preconfigured GTM container
- If you are unsure how importing works, please see the “How to import a container” section in this post.
- Update Google Analytics Settings variable
- Navigate to Variables -> User Defined Variables -> UA-00000-0 -> Variable Configuration
- Change the default Tracking ID to your Google Analytics property UA code. To locate your UA code, visit Google Analytics > Admin > Property > Tracking Info > Tracking Code.
- Note: If you already have a pageview tag setup in your GTM account, my preconfigured container will overwrite it. If you have a standard pageview install, this will not cause any other issues; just make sure to update the new pageview tag with your previous tag’s settings.
- Update Blog Post Author variable
- Navigate to Variables -> Blog Post Author
- You will see the following:
- Replace the code under Custom JavaScript with the code you generated in the above step.
- Publish the workspace.
Verify Correct Implementation
Verify in Google Analytics
Please note that you may have to wait some time before you can verify that the data is being correctly pulled into Google Analytics as a custom dimension. This may be foreign to even advanced GTM users who are used pushing custom events and almost instantaneously seeing them populate in the GA Real-time reports. Here, since we are pushing custom dimensions, the data is limited to standard processing latency of 24-48 hours.
If you are feeling impatient, skip to the next section to verify as best as you can for now.
Once you have waited for the data to populate into GA, navigate to Google Analytics -> Acquisition -> All Traffic -> Channels and change secondary dimension to Author
The above report is segmented by the Default channel grouping, so each author will appear in the chart multiple times due to having multiple referral sources. I prefer to do the following to group solely by the author: Navigate to Google Analytics -> Audience -> Custom -> User Defined and set Secondary Dimension to Author as below.
This is the best way I have found in GA to quickly aggregate by a custom dimension. For a more official-looking report (that doesn’t include a not set user-defined value), I would consider using a custom GA report dashboard or Google Data Studio.
Verify in Google Tag Manager Preview
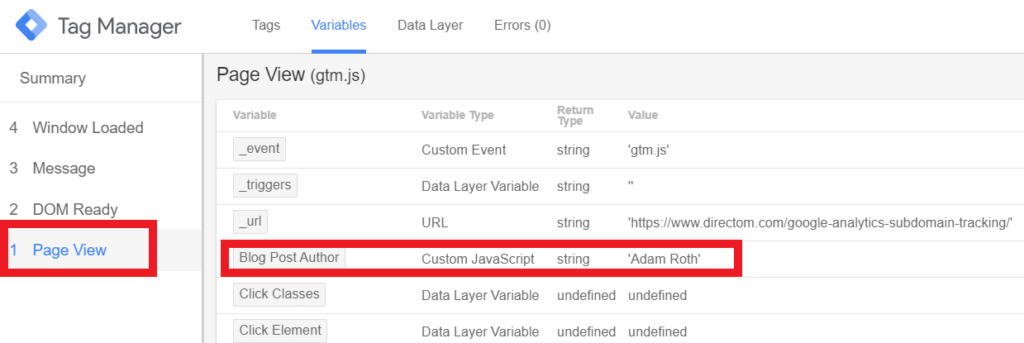
Once again, with this non-standard implementation, the data verification is, well, non-standard. Luckily, that doesn’t mean it is difficult. Launch GTM preview mode as you normally would and open one of your blog posts in Google Chrome. In the preview window, navigate to Page View (or Window Loaded) -> Variables. If you have correctly implemented, you should see Blog Post Author populating as seen below:
Conclusion On Implementing Author Analytics Tracking In GA
Given the importance of content generation to SEO and website marketing efforts, tracking posts by blog authors can be crucial. As always, I hope I made this implementation as easy as possible. If you have any questions, please feel free to message me on LinkedIn or submit our contact us form.
To get more information on this topic, contact us today for a free consultation or learn more about our status as a Google Partner Agency before you reach out.


