7 Easy Steps To Set Up Cross Domain Tracking With Google Tag Manager (Updated 2020)
Editor’s Note: With the announcement that Google is going to be sunsetting Universal Analytics in 2023, this process for setting up cross domain tracking will become obsolete. Trying to set up and properly configure cross domain tracking in Google Analytics 4? Learn how to do that here – 4 Easy Steps To Set Up Cross Domain Tracking With GA4.
Let’s begin by dispelling the myth that cross-domain tracking is difficult to set up: it isn’t.
If all you want to do is get cross-domain tracking functioning correctly on your website, feel free to skip ahead to the section titled “Part II: Steps to Setting Up Cross-Domain Tracking.” If you follow the steps outlined in that section, you will have a correctly functioning installation of cross-domain tracking with no changes to your existing data.
There are, however, some confusing aspects of cross-domain tracking, and they all have to do with understanding the concepts behind it.
If you feel you need to brush up on the broad picture of cross-domain tracking, don’t skip ahead, just keep reading—because Part I of this article will explain the following:
- What is cross-domain tracking?
- Why would I need cross-domain tracking?
- What are the implications of cross-domain tracking?
Part I: Overview of Cross-Domain Tracking
1. What Is Cross-Domain Tracking?
Cross-domain tracking is a way to analyze visitors across multiple websites in a single analytics view. Implementing cross-domain tracking essentially allows you to report on the traffic of multiple websites as if they were one big website.
From a conceptual point of view, Google has added its fair share of red tape to what could be a very simple thing to achieve. I suspect that a correctly set up GA account is used as partial input into the RankBrain portion of Google’s ranking algorithm (in effect—positive feedback propagation), though I have little concrete evidence to support this.
In Part I of this guide, I will attempt to explain the concepts behind this implementation process. This will be helpful to those of you who have read enough to be effective, but still cannot fully grasp cross-domain tracking.
Part II is a step-by-step procedure for implementing cross-domain tracking. Feel free to skip ahead to that section if you don’t care about “why” this is the only method that works.
2. Why Would I Need Cross-Domain Tracking?
First and foremost, please be sure that you are looking to track users across multiple domains and not multiple subdomains.
If you are unsure of the difference, please read the “Cross-subdomain vs. Cross-domain” section of the following article: How to Track Users Across Subdomains.
3. What Are the Implications of Cross-Domain Tracking?
With conventional GA account set up (without cross-domain tracking), there is a 1:1 ratio of domains to properties—meaning that each domain under a given account is set up as its own property with a unique tracking ID.
This is great for understanding user behavior across single sites, but does not allow for macro-level insights. Companies that own multiple domains often need to know how users behave across multiple related websites.
A prime example we commonly see is within the ecommerce industry, where many sites use a third-party payment domain such as PayPal. When customers make a purchase, they are redirected to a PayPal domain and then redirected back to the ecommerce site following payment.
Without cross-domain tracking, the user experience is split into 2 unique sessions and the acquisition medium/source for the purchase is set to referral/PayPal, instead of retaining the original medium/source (which was most likely not referral/PayPal but something like organic/google).
Using the account structure above, imagine that a user navigates the following path: Google Search > exampleSite1.com > exampleSite2.com.
In the above scenario, Google Analytics will report one session under the exampleSite1.com property views as organic search traffic AND one session under the exampleSite2.com property views as referral traffic from exampleSite1.com. This means that looking at the data as a whole, we would see the following:
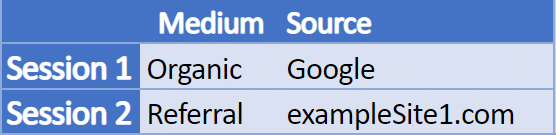
If we were to export the raw data from these two GA properties and combine the two sets of data, we would gain little to no valuable insights. This is because under the conventional setup, a new session is created when a user travels from one domain to another.
To correctly report cross-domain tracking, we need to negate this problem so that our example user is reported as a single session, as seen in the chart below, regardless of the domain visited:

This is great for understanding user behavior across single sites, but does not allow for macro-level insights. Companies that own multiple domains often need to know how a single user behaves across multiple related websites.
You may think that simply applying the same tracking code to multiple websites would fix this issue, but it doesn’t. Instead, sessions are still reset upon cross-domain navigation. Additionally, this type of fix makes reporting at the page level very confusing because visitors of exampleSite1.com/pageA.com and visitors of exampleSite2.com/pageA are both reported to be on the same page, namely pageA.
You may have come across other methods to implement cross-domain tracking, but be warned: every one of these methods will have negative consequences for your site traffic data. I highly recommend that you follow the steps outlined in Part II of our guide below to set up cross-domain tracking.
Part II: Steps to Setting Up Cross-Domain Tracking
1. Set Up Google Analytics
If you don’t currently use GTM for page tracking on your site, we recommend creating a completely new account structure that will be used exclusively for cross-domain tracking. Setting up your GA in this way will allow you to keep the existing tracking codes on your websites. Plus, it will not change the way your data is reported in the views you currently use.
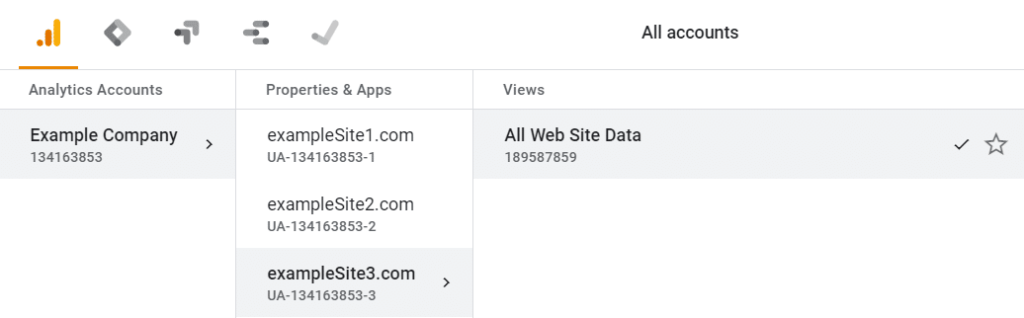
To create a new GA account, navigate to the admin section of Google Analytics and click “Create Account.” You will only need one property in this account, as we will use the same tracking ID for all websites that you wish to include in cross-domain tracking.
If you do currently use GTM for page tracking on your site, you should finish out the remaining actions for step 1 below, then skip step 2, and proceed to the “Configure Existing Container” section of step 3.
To finish setting up your GA account, you will have to update the referral exclusion list and prepend hostname to URLs. Updating the referral exclusion list ensures that the session count is not reset when a user navigates between domains.
To add domains to the referral-exclusion list, navigate to Google Analytics > Admin > Property > Tracking Info > Referral Exclusion List > Add Referral Exclusion. Add all of the domains that you wish to be included in cross-domain tracking separately to this list.
Next, you should tell GA to prepend hostname to URLs. This is a fancy way of saying we would like to see the entire URL in the GA reports, instead of just the page name. This is important because if user A is on www.exampleSite1.com/pageA and user B is on www.examplesite2.com/pageA, without making this change, both users would be reported to be on /pageA. And, there would be no context to distinguish which site these users were on.
To prepend hostname to URLs, navigate to the admin section of GA > View > Filters > Add Filter. Use the following settings:
Filter type: Custom filter > Advanced
Field A ? Extract A: Hostname = (.*)
Field B ? Extract B: Request URI = (.*)
Output to ? Constructor: Request URL = $A1$B1
Check the following boxes: Field A Required, and Override Output Field
2. Create a GTM Account
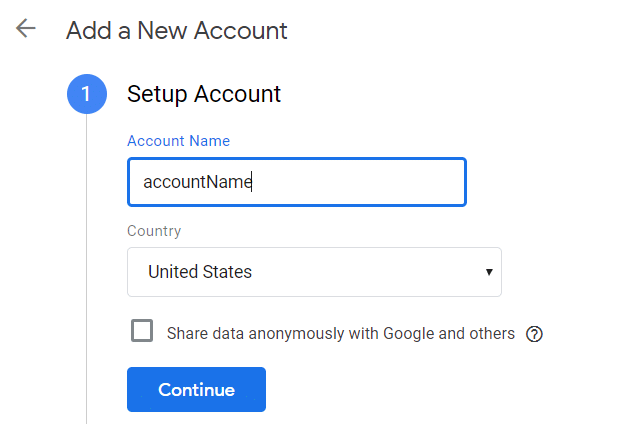
If you already have a GTM account, you can proceed to the next step, “Configure GTM Container.” If you do not have a GTM account, you can create one by visiting the Google Tag Manager website, logging in using a Google account, and clicking “Create Account.”
You will then be taken to the form in the screenshot below. Fill it out and click “Continue.”
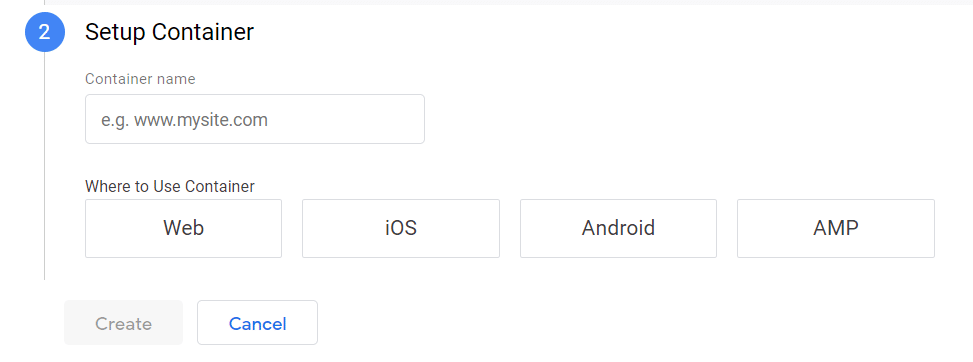
The second half of the form will then appear. Name your container, click “Web,” and then click “Create.”
3. Configure GTM Container
Import preconfigured container
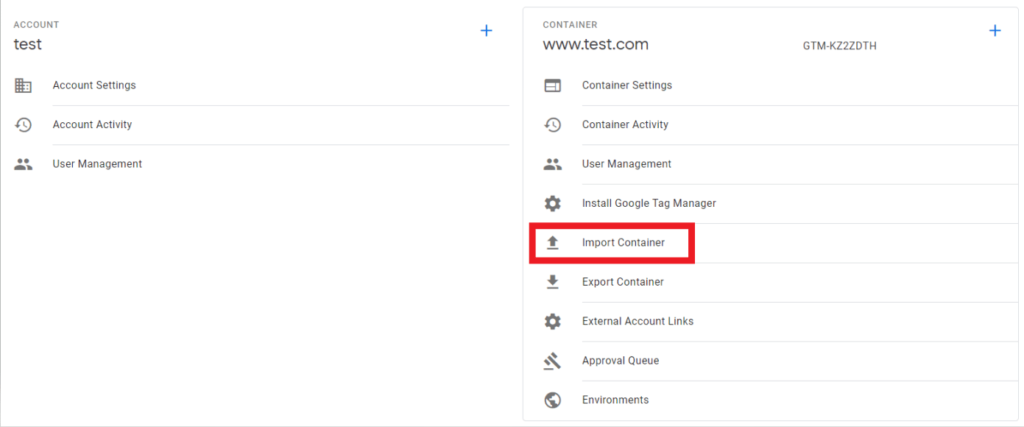
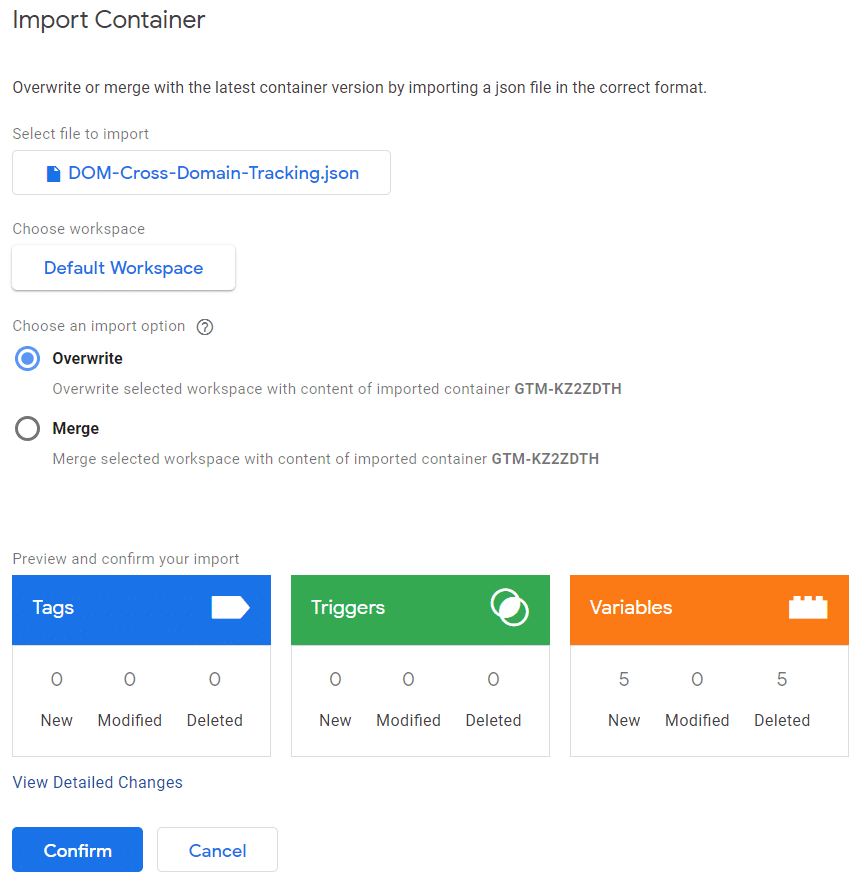
Click the link and download the container to your computer. Navigate to the admin section of your GTM account, and click “Import Container.”
Select the container file on your computer, choose to import to an existing workspace, and select “Default Workspace.” Select the “overwrite” import option, and click “Confirm.”
There are only two changes that you have to make to the container to get it up and running.
Navigate to the variables section of your workspace and you will see two variables defined under user-defined variables: Auto_Link_Domains and Tracking_ID. Set the value of Auto_Link_Domains to a comma-separated list of the domains you wish to include in cross-domain tracking, and click “Save.”
Set the value of Tracking_ID to the tracking ID of the GA property you want to use for cross-domain tracking. This can be found within Google Analytics under Admin Section > Property > Tracking Info > Tracking Code.
Configure Existing Container
Make sure that you have an existing container that uses a tag of type “Google Analytics – Universal Analytics.”
You can check this by clicking on tags in Google Tag Manager and searching for “Google Analytics – Universal Analytics” under the type column. See the screenshot below for an example.

If you don’t see a tag of this type, you are OK to go ahead and use the preconfigured container outlined in the step above. If you do see a tag of this type, there are two changes that you need to make to it.
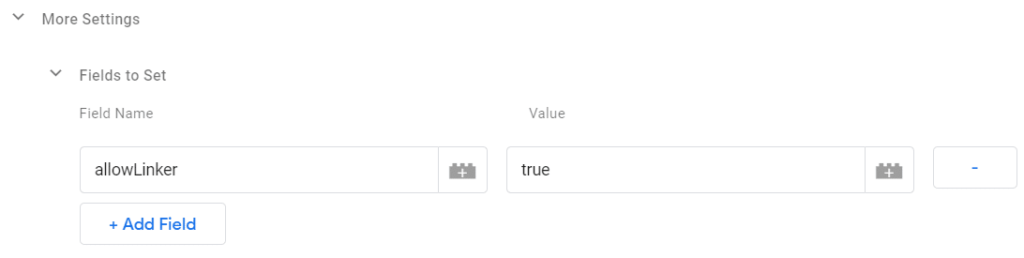
First, click on the tag to edit it. Under More Settings > Fields to Set, set Field Name to “allowLinker” and Value to “true.”
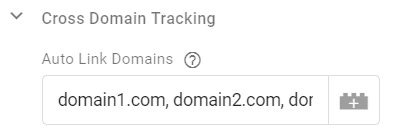
Next, under More Settings > Cross Domain Tracking, enter a comma-separated list of the domains you wish to include in cross-domain tracking.
4. Insert Code on Website and/or Remove Old Code
Publish your GTM container live by clicking the “Submit” button. If you already use GTM on your website, congratulations: you have implemented cross-domain tracking! You can skip the remainder of this step.
If you have not previously used GTM on your website, you must install the tracking code. Within your GTM workspace, navigate to Admin > Container > Install Google Tag Manager. Follow the steps there to install the GTM code on your website.
If you have any existing tracking codes on your website, you should not remove them.
Congratulations! If you followed the steps in this tutorial, you have successfully implemented cross-domain tracking.
Conclusion
The goal of this blog post is to simplify the integration of cross-domain tracking. As you may have noticed, most of the difficulty is in understanding the concepts behind it in order to select the correct parameters for your environment.
If you have any questions or are interested in getting more value and actionable insights from your Google Analytics data, ask us today for a free consultation.
To get more information on this topic, contact us today for a free consultation or learn more about our status as a Google Premier Partner before you reach out.