Facebook has over 1.8 billion active users worldwide. The platform dominates the attention spans of millions. Therefore, Facebook launched its very own advertising platform that made it an instant game-changer in the world of digital marketing.
Companies around the world are hopping on the bandwagon, and having a Facebook advertisement in one form or the other has become a necessity to reach their target audience. The first step towards this approach is to set up your Facebook Ad Manager.
Set Up Your Facebook Ad Manager
Advertising on Facebook provides your business with a unique opportunity to approach and engage with your target audience for various reasons.
Before you can get into using Facebook Ad Manager, you will need to create a Facebook business page. However, you will always be able to access the Ads Manager directly from your Facebook page. You can access the options through setting buttons on your Facebook page or App located at the top right corner.
Steps to Set Up Your Facebook Ad Manager
It is a simple seven steps process to set up your Facebook Ad Manager account.
Step 1: Confirming Your Information
When you first come to the Ads Manager setting, you will get an option to set up your Facebook Ad Manager account. Here you must provide your basic information, and Facebook automatically assigns you an account ID number generated randomly. You can also set your time zone and preferred currency for display and payment purposes.
Step 2: Selecting a Campaign Objective
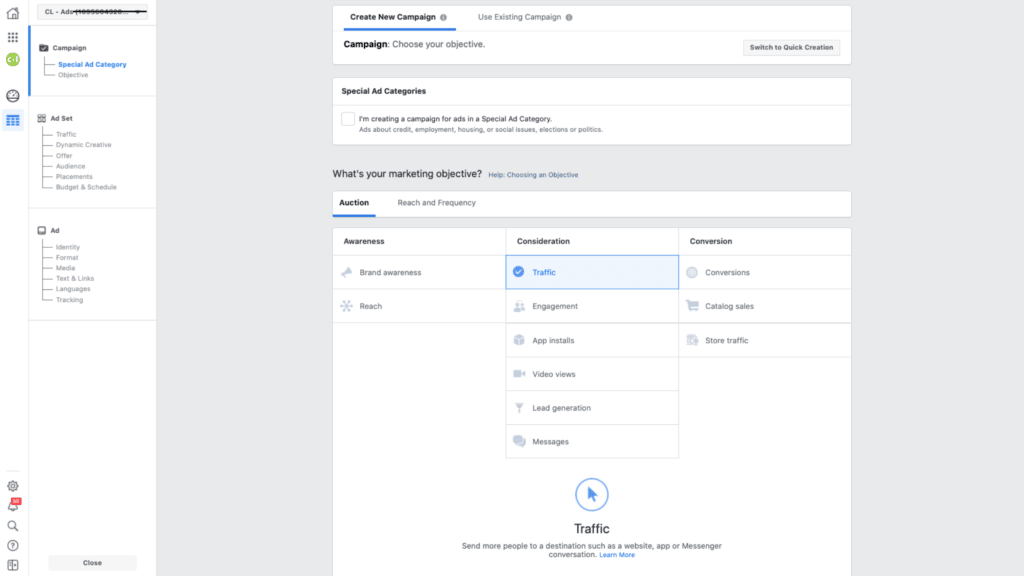
You can choose from a variety of campaign objectives to match your advertisement goals. Here is a list of campaigns available.
- Local awareness
- Brand awareness
- Traffic
- Reach
- Lead generation
- Video views
- App installs
- Conversion
- Store traffic
- Messages
- Product catalog sales
You can choose the campaign type that reflects your goals. For example, if you are promoting a product on a website, you should select a “conversion” campaign, etc.

Step 3: Naming Your Campaign
The next step will be to give your advertisement campaign a name. Itis simple yet critical at the same time to use a name that identifies with each campaign.
Step 4: Defining Your Target Audience
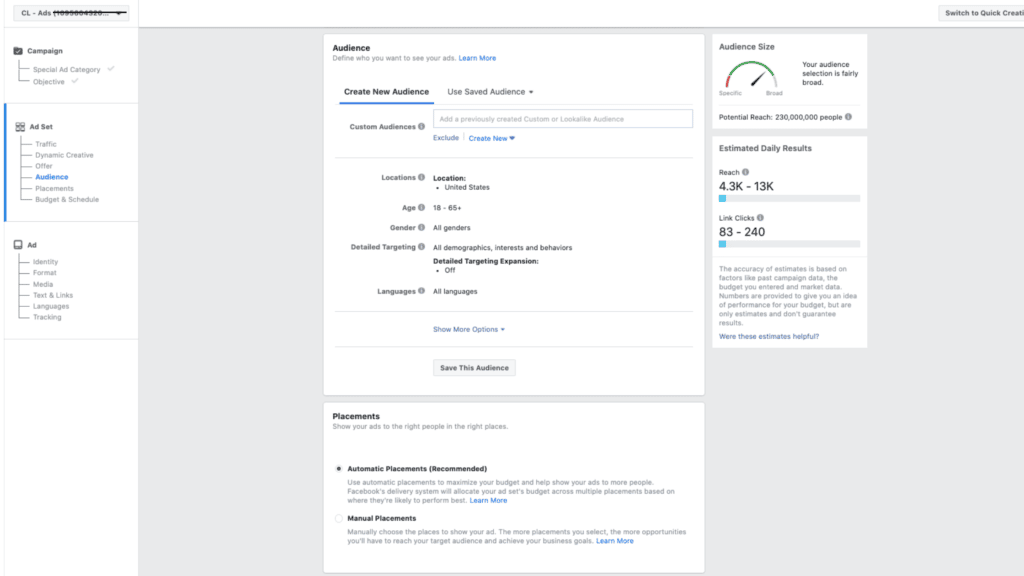
Facebook has lots of effective and powerful options to target your audience. The ads with a specific audience and budget are more likely to bring you ROI than a broadly defined advertisement.
As you specify your audience, Facebook will show you the estimated daily reach and inform you if the audience is too small, large, or at an optimum level. Setting up your audience has unparalleled importance to bring in the results you desire.
Step 5: Setting up the Placement
“Automatic placements” is a default setting on Facebook Ad Manager. Therefore, you must optimize the placement for better results. Here is the full list of placements on Facebook:
- Instant Articles
- Feed
- Right column
- Stories
- Market place
- In-stream videos

Step 6: Campaign Budgeting and Bidding
Next, you need to set up your campaign budget and bidding limits.
Step 7: Setting up Your Payment Method
This is the last step in the process, i.e., to set up a method of how you would like to handle your payments for each campaign. You will need to provide a name, address, and credit card or PayPal account information and complete the setup.
All Set
Once you have completed the above-mentioned seven-step process, you have set up your Facebook Ad Manager. Now all you need to do is create an ad and promote your brand, product, or service.
If you want to learn more about if Facebook advertising is right for business or have some questions, let’s talk!


